 This version (2023/05/10 09:40) was approved by katrin.The Previously approved version (2023/05/10 09:42) is available.
This is an old revision of the document!
Dask on JupyterHub
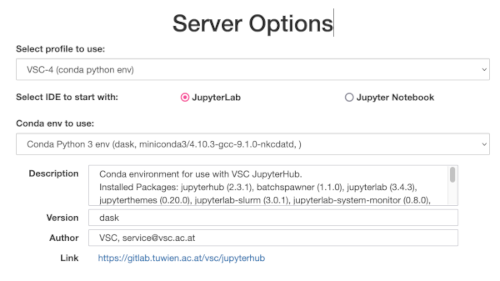
Profile & Environment
The VSC JupyterHub already provides a conda environment so users can just start using dask without installing anything.
Since we run updates in regular intervals the exact name may vary.
At the time of writing the most current name was jupyterhub-vsc-python-v1
Python Example
To properly use dask from the jupyterhub conda environment use the following code to get started
##########################################################################
# if you are running on a shared node it is important to setup some dask variables
# to not prevent interfering with other users dask setups (e.g. dashboard port ...)

import os
import dask
import dask.config
import dask.distributed

USER = os.environ.get('USER')
if USER.startswith('trainee'):
    user_number = int(USER.replace('trainee', ''))
else:
    user_number = hash(USER) % 100
print('user_number:', user_number)

DASHBOARD_PORT = 45000 + user_number
SCHEDULER_PORT = 46000 + user_number
###########################################################################

print('dashboard port:', DASHBOARD_PORT)
print('scheduler port:', SCHEDULER_PORT)

dask.config.set({'temporary_directory': f'/tmp/dask-{USER}'})
print('temporary directory:', dask.config.get('temporary_directory'))

dask.config.set({'distributed.dashboard.link': f'/user/{USER}/proxy/{DASHBOARD_PORT}/status'})
print('dashboard link:', dask.config.get('distributed.dashboard.link'))
Info
For a complete and up 2 date list of configuration parameters have a look at the dask documentation: https://jobqueue.dask.org/en/latest/generated/dask_jobqueue.SLURMCluster.html
from dask_jobqueue import SLURMCluster

cluster = SLURMCluster(queue='skylake_0096',   # the slurm partition we want to use for dask-worker processes
                       #account='p70824',      # the account (=VSC project) used for accounting
                       cores=16,               # number of physical processor cores per SLURM job
                       memory='4GB',           # memory one SLURM job should have avaliable (will be divided by number of worker processes in job)
                       processes=2,            # number of dask-worker processes (=python processes) per SLURM job
                       name=f'{USER}-worker',  # custom name of dask-workers (used in dask internally)
                       walltime='00:30:00',    # time a SLURM job will run for e.g. 30 minutes; after that all dask-worker in the job will shutdown
                       interface='ib0',        # ib0 is the name of the fast network connection on VSC-4 & VSC-5
                       scheduler_options={
                           'interface': 'ib0',                          # scheduler should also use ib0
                           'port': SCHEDULER_PORT,                      # custom scheduler port (dask-worker processes will use this to connect)
                           'dashboard_address': f':{DASHBOARD_PORT}',   # custom dashboard port from earlier
                       },
                       # if you use adaptive scaling you might want to set these as well
                       # see https://jobqueue.dask.org/en/latest/advanced-tips-and-tricks.html#how-to-handle-job-queueing-system-walltime-killing-workers
                       #worker_extra_args=[
                       #    '--lifetime', '25m',
                       #    '--lifetime-stagger', '5m'
                       #],
                       job_directives_skip=[
                           '-J dask-worker',              # skip the default SLURM job name
                       ],
                       job_extra_directives=[
                           f'--job-name={USER}-worker',   # set a custom SLURM job name
                           '--qos=skylake_0096',          # set e.g. a custom qos that provides you with faster scheduling
                           #'--reservation=training',     # an optional reservation to use
                       ])

# the settings from above are turned into a slurm job script that can be
# displayed for debugging by using the 'job_script' method
print(cluster.job_script())
After running the above code you have a cluster instance that holds the dask scheduler and all the information to spawn dask-worker processes that will actually execute the generated tasks. So far no worker processes have been spawned yet. You can always check this by running
$ squeue -u $USER
The next step we need to take is now to scale up the cluster to get some worker processes running. In dask there are two options available:
- scale: scale the cluster to a fixed number of jobs (or workers) depending on the arguments
- adapt: set minimum and maximum number of jobs and the cluster handles scaling according to the current load
Since they are scheduled via SLURM it depends heavily on your resource settings from earlier how long it will take to get them scheduled and be in a running state.
# use 'scale' to schedule a fixed number of slurm jobs that host dask-worker processes
cluster.scale(jobs=1)

# OR use 'adapt' to use adaptive scaling
#cluster.adapt(minimum_jobs=1, maximum_jobs=10)

# call the 'get_logs' function to see if everything is ok
cluster.get_logs()
After executing the above code using scale you should see jobs appearing in slurm that are called '<username>-worker'
$ squeue -u $USER
             JOBID            PARTITION     NAME     USER ST       TIME  NODES     NODELIST(REASON)
            475376         skylake_0096 user-wor     user  R       0:22      1            n4902-030
The next step is important: here we create a dask distributed client that uses the cluster instance.
From this point on all scheduled tasks will be sent to the cluster for execution
from dask.distributed import Client
client = Client(cluster)
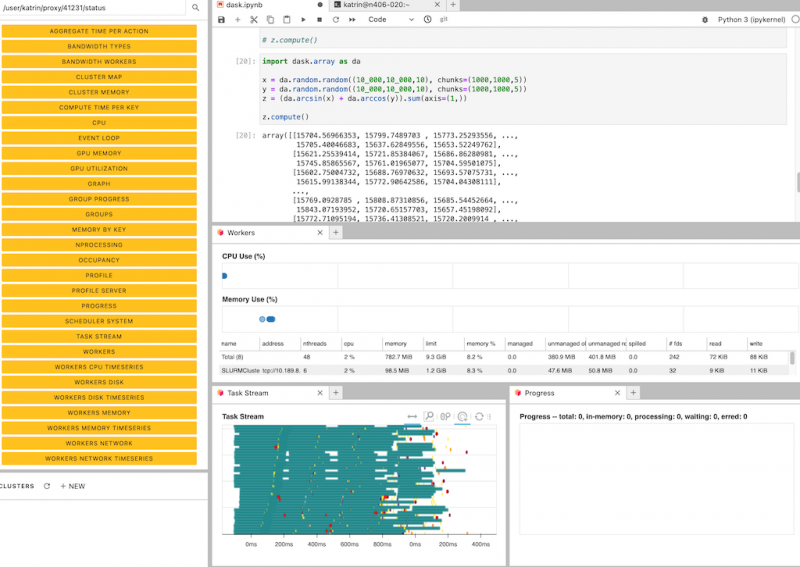
After the slurm jobs with the worker processes are running we can finally schedule some work via dask:
import dask.array as da

x = da.random.random((1000, 1000, 10), chunks=(1000, 1000, 5))
y = da.random.random((1000, 1000, 10), chunks=(1000, 1000, 5))
z = (da.arcsin(x) + da.arccos(y)).sum(axis=(1,))

z.compute()
To cleanup resources one can close client & cluster and delete the references. By doing this everything related to those instances will be freed as well.
client.close()
del client
cluster.close()
del cluster

